Showing posts with label Howto. Show all posts

Monday, February 23, 2015

Adam’s Kraut Burgers

Adam’s Kraut Burgers


SERVES:  8
READY IN: 2 hours


DOUGH INGREDIENTS:
  • 1 packet "highly active" active dry yeast; or 2 1/2 teaspoons active dry yeast; or 2 ½ teaspoons instant yeast
  • to 1 ⅛ cups lukewarm water*
  • 1 ¼ teaspoons salt
  • 3 tablespoons sugar
  • 6 tablespoons unsalted butter, at room temperature
  • ½  cup instant mashed potato flakes
*Use the lesser amount in summer (or in a humid environment), the greater amount in winter (or in a dry climate), and somewhere in between the rest of the year, or if your house is climate controlled. In Colorado I usually use the maximum.


FILLING INGREDIENTS:
  • 1 lb Ground Meat (Lean Beef, Buffalo, German Sausage, be creative!)
  • ½ of a 6” to 8” head of green cabbage
  • 1 Large Yellow Onion
  • 3-4 Cloves of Garlic
  • Salt and Pepper to taste. Note, you will need a lot, ½ - 1 ½ tablespoons.
  • ¾ lb. Munster Cheese

METHOD:
1) If you're using active dry yeast, dissolve it with a pinch of sugar in 2 tablespoons of the lukewarm water. Let the yeast and water sit at room temperature for 15 minutes, until the mixture has bubbled and expanded. If you're using instant yeast, you can skip this step.
2) Combine the dissolved yeast (or instant yeast) with the remainder of the ingredients. Mix and knead everything together—by hand, mixer or bread machine set on the dough cycle—till you've made a smooth dough. If you're kneading in a stand mixer, it should take 5 to 7 minutes at second speed, and the dough should barely clean the sides of the bowl, perhaps sticking a bit at the bottom. In a bread machine (or by hand), it should form a smooth ball.
3) Place the dough in a lightly greased bowl. Cover the bowl, and allow the dough to rise, at room temperature*, until it's nearly doubled in bulk, about 1 hour. Rising may take longer, especially if you've kneaded by hand. Give it enough time to become quite puffy.

*If you preheat your electric oven to 400°F for 1 minute and then turn it off this creates a perfect ~80°F “room temperature” rather than finding a warm spot in your home.
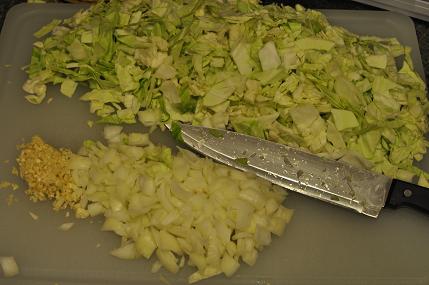
4) After the dough has risen begin preparing the filling. Shred the cabbage, avoid getting too much of the bitter white core. Peel and shred the onion. Peel and dice the garlic.  
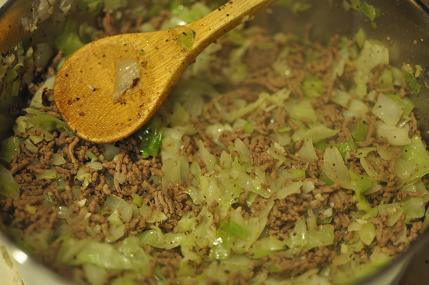
5) Brown the ground meat over medium heat in a large 4 qt pot, drain and return to pot. Add the garlic and onions, cook until translucent, about 4-5 minutes. Add the cabbage, cover and reduce heat to medium-low. Allow the cabbage to wilt, 5-10 minutes. Remove the lid and stir well. Add salt and pepper to taste. Continue to cook for an additional 5 minutes. Make sure everything is well blended, remove from heat.
6) Preheat oven to 400°F. Slice the cheese into 8 equally sized slices. They should be a little thicker than normal cheese slices.
7) Punch-down the dough and divide into 8 equally sized pieces with a bakers scrapper. With a rolling pin quickly roll out one of the small pieces of dough into a rough circle about 10” in diameter on a lightly floured surface, this does not have to be perfect. The dough should be about ⅛” thick.
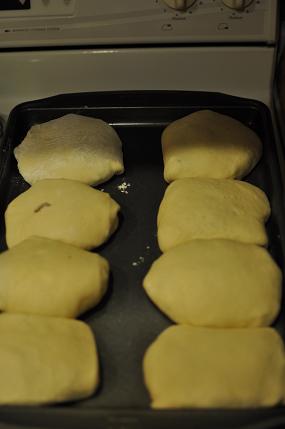
8) Place a slice of cheese in the center of the dough, then a scoop of the filling. Roughly ½ cup. Then draw the corners and edges together in the center on top of the filling. The dough should stick to itself sealing the burger. Place the burger seams down on a lightly greased baking sheet.
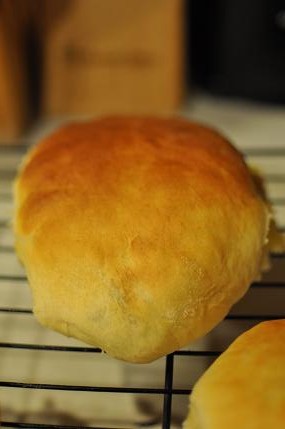
9) Repeat for the other 7 pieces of dough. Then bake for ~20 minutes or until golden brown. Remove from baking sheet and allow to cool on a rack for 5 minutes before serving.


NOTES: The above dough recipe is very basic and guaranteed to give you the proper results. Experiment using your favorite, more advanced bread dough recipe. The dough recipe also makes great dinner rolls, http://www.kingarthurflour.com/recipes/soft-white-dinner-rolls-recipe


Pictures are of a double batch (16 burgers)


Sunday, February 17, 2013

Bacon Wrapped Jalapeno Poppers


These spicy bites can be tailored in a number of ways, this is one of the simpler ones. Add ground meat to the mix to add another dynamic or peanut butter if you're feeling nutty.


Ingredients

  • 8 Extra Large jalapeño peppers or up to 15 smaller ones
  • 1 package softened cream cheese
  • 1 cup mild cheddar cheese
  • 1 lb sliced bacon
  • 1 craft beer*


Preparation Instructions

  1. Slice the top off each pepper, slice in half, then remove the ribs and seeds.
  2. Blend the cheddar and cream cheese together with clean hands. Season as desired, not required.
  3. Stuff a good amount of the cream cheese mixture inside each pepper half.
  4. If using smaller peppers take the bacon and cut the strips into 2 pieces (cut the short way, not the long way). If using large peppers you can use a whole slice.
  5. Wrap a bacon piece around each pepper, secure it with a toothpick if necessary. I usually don't.
  6. Cook using one of the following methods.


Grill:

  1. Prepare your grill for indirect grilling at around 375˚F.
  2. Place the peppers on the top of a broiler pan (set aside the bottom) or mesh pan.
  3. Place the broiler pan on the grill grates.
  4. Grill for 25-30 minutes or until the bacon is sorta crispy.
  5. Remove from grill and serve hot.


Bake:

  1. Place a wire rack in a rimmed baking sheet and place the poppers on the wrack.
  2. Bake at 375˚F for about 25-30 minutes or until the bacon is sorta crispy.
  3.  Remove from oven and serve hot.


*unnecessary but it sure makes assembly more enjoyable.


Friday, January 25, 2013

I found a cure for the cold weather blues.

Traeger makes a really nice insulation blanket for their pellet grills, but they cost $144 more than this.


So Traeger pellet grills are really an amazing tool for turning damn near anything into an amazing meal. They run on hardwood pellets that are fed into the firebox to maintain a user setpoint (in degrees) or when dialed to the smoke setting they do just that.


This is my Traeger BBQ075 Texas Grill
"Designed after the traditional Texas Style wood cookers, the Texas brings old fashioned wood cooking into the 21st century by featuring a high-tech auger-fed burner, electronic autostart ignition, multi-position digital thermostat control, and EZ-drain grease system."

This thing is great but when the weather gets cold you find your grill burning extra fuel to overcome the cold ambient temperatures. There are a few ways to help combat this, one is to increase the thermal mass by adding firebricks or sand. The second is to insulate the barrel to try and keep the heat from escaping in the first place.

Traeger offers a solution but there are a couple flaws to their method  First, it doesn't play well with the front folding shelf. Second, it does not cover the bottom of the barrel. Third, it's down right expensive. The proper blanket for my machine is $179.

So I took matters into my own hands, did some reading and research from reputable sources like pelletheads.com and then began thinking of ways to combat the cold. 

What I came up with was an understanding that the barrel of my Texas grill is just over 6 feet in diameter. Tillman makes welding blankets that are 3' X 3' and are resistant to temperatures up to 1800°F. They are also Non-flammable, non-melting, non-shrinking, scratch free.

The best price I found on these was a CyberWeld for $22.95 X 2 + FREE S/H = $45.90.


Next I thought about what the best way to secure these blankets to the barrel of the machine. I thought about sewing nylon straps to them and using clips like Traeger does but talked myself out of it because sewing thick materials suck and they look like they interfere with the lid closing. So what I came up with was rare earth magnets. 


I searched around and found 10-pc Strong Rare Earth Disc Magnets 3/4" x 1/4" Neodymium on Amazon for $9.29 + $1.75 S/H = $11.04.

I received both packages within 3-4 days and put everything together. 


I placed the blankets on top and bottom and secured them with the magnets. Everything fit very nice and the magnets did a great job of sticking the blankets to the grill.

Bottom / under the folding shelf
Lid open


Here are a couple of angles via the camera phone, sorry about the haze. I'm too lazy to get out the big Nikon.

Backside
Scary magnet warning that came on the box - They are pretty powerful with 19lbs of pull force.

I then fired it up and gave it a test run. It heated very fast and maintained temp much better than before. I'll be curious to see how much it saves on a low and slow cook.

A nice smoky startup.


The internal temperature is quickly approaching 450°F, the surface of the blanket it under 120°F and you can hold your hand on it infinitely. 


The magnets on the other hand get rather hot, so be careful!

Non-scientific temperature measurement.


Not bad for a cold Colorado night ~19°F

So, hopefully it works out as well for you as it did for me. More importantly, saves you some $$$

Total build cost = $56.94


Wednesday, January 23, 2013

Damn you Dodge!

Dealer says $379, cuda2000 says do it yourself for less!


So I had the same problem that many others have had, a drippy hose. Not the kind that pills can fix either.

I knew I had a small leak but hadn't had a chance to take a look at it so when my 2008 Dodge Grand Caravan was at the dealer getting the 4th transmission installed, yes that is not a typo I said fourth transmission they also noticed the leak and offered to fix it. The service advisor called and said "have you noticed any smoke or a sweet smell coming from your van?" I said yes, I have a coolant leak but haven't had a chance to look for it. He said "it's a bad heater hose and we can fix it for $379." He says "it's a real bitch and the part alone is $139." So I said let me think about it and I'll give you a call back. 

So in normal fashion I hit the Google and found cuda2000's video. I watched it and called the dealer back and said don't worry about the hose, I'll take care of it myself.

I then hit Amazon and purchased the following parts...

Gates 28491 5/8 Inch Polybag Heater Hose

Precision Brand M6S Micro Seal, Miniature All Stainless Worm Gear Hose Clamp, 5/16" - 7/8" (Pack of 10)


Goodyear 65642 Connector for Fuel / Vacuum / Heater Hose


Cost including Amazon Prime 2 day shipping: $23.81 + 1 Gallon of Antifreeze ($12.47) = Total Cost of $36.28.


I did not drain the entire system, I just removed both the supply and return lines, lost about a cup of fluid. Replaced the parts as cuda2000 described and refilled the system as nessesary.


The Leaky "Y"


That son of a...

The new "T"

A view from farther back.
So all in all it took less than an hour and saved me over $300 plus a day in the shop. Many have asked if the Tee's impact flow or effect the system in any negative manner. The answer is no, not unless your super smart minivan knows it's alphabet.

Sunday, December 9, 2012

Italian Sodas

Simple, refreshing and fun.


My girls recently tasked me with making Italian Sodas. I was rather surprised that they new what an Italian Soda was and even more surprised that they thought I was going to pull this off. Quickly I went to Google and Pinterest and did a little homework. I found many recipes and concepts so I took a few mental notes and headed to the market.

I picked up the following...

  • 6 oz. Organic Raspberries
  • 6 oz. Organic Blackberries
  • Club Soda
  • Organic Half and Half (Optional)
  • Organic Cane Sugar
  • Whipped Cream (optional)


Once I returned I quickly made the fruit syrups. In the blender I added 6 oz. of Raspberries, 1 cup of sugar and 1/2 cup of filtered water. On a Blendtec hit the "syrups" button, on all others blend on the highest setting for 60 seconds. All of the seeds should be gone and you should have a very smooth syrup  if you do not pour the mixture through a fine sieve. I did the same for the blackberries and then poured them into small mason jars for storage. These syrups should keep for at least a week in the refrigerator.


Next I broke out some glassware, ice, chilled club soda, half and half and a stirring utensil.


I'm using 8 oz glasses so first pour about 2 oz of your syrup into the bottom of the glass.

Add a scoop of ice. Around 2 -3 oz.

Add 3-4 oz of club soda.
Then top with about 1 oz. of half and half.

Stir, top with whipped cream and enjoy!


Note: Dairy products are optional, these can be omitted and the recipe can be adjusted accordingly. So is homemade syrup. There are plenty of quality premade syrups. Monin's are amongst my favorite.


Friday, September 28, 2012

Strawberry Bourbon Milkshake


Now all you're missing is your favorite cigar.


Ingredients:

  • 1 Cup Whole Milk
  • 1 Tbsp Honey
  • 2 oz. Bourbon
  • 4 scoops Ice Cream (Strawberry or Vanilla)
  • 8-10 Frozen Strawberries


Layer ingredients in blender jar as listed. Press the "Ice crush/Milkshake" button on your Blendtec or somewhere around medium for about 25 seconds on other blenders. Blend until smooth. Serve and enjoy!


Wednesday, September 19, 2012

Easy Dulce de Leche


This is too easy....


I am quite a Pinterest junkie here of lately and I am always finding cool things but I am often skeptical if the post yields what it says it does. The latest one that has peaked my interest is Caramel in a Can. Looks and sounds easy so I had to give it a try.


Things you'll need:

1 - 14oz can of Sweetened Condensed Milk
1 - Small pan of boiling water
1 - Lot of time


Normally I would buy Eagle Brand but I opted for the store brand because it was a traditional can and Eagle Brand had an easy open top that I figured would explode. Normal top good! Ingredients should be Milk and Sugar.


Fill your pan full of water and submerge your can of Sweetened Condensed Milk.


Set it on low and let it simmer for around 3 hours checking occasionally, turning the can and adding water as necessary. I forgot about mine and it ended up cooking for almost 4 hours. Apparently over cooking does not have any negative effects.


Remove from the heat and cool. If you are like me and you inner child says "Come on, come on, come on.... Let's open the can and taste it" then I suggest adding ice to the pan and at least getting the temp down below 120F. This way if any shoots out when you open it you won't get burned.


Once cool, open and enjoy!